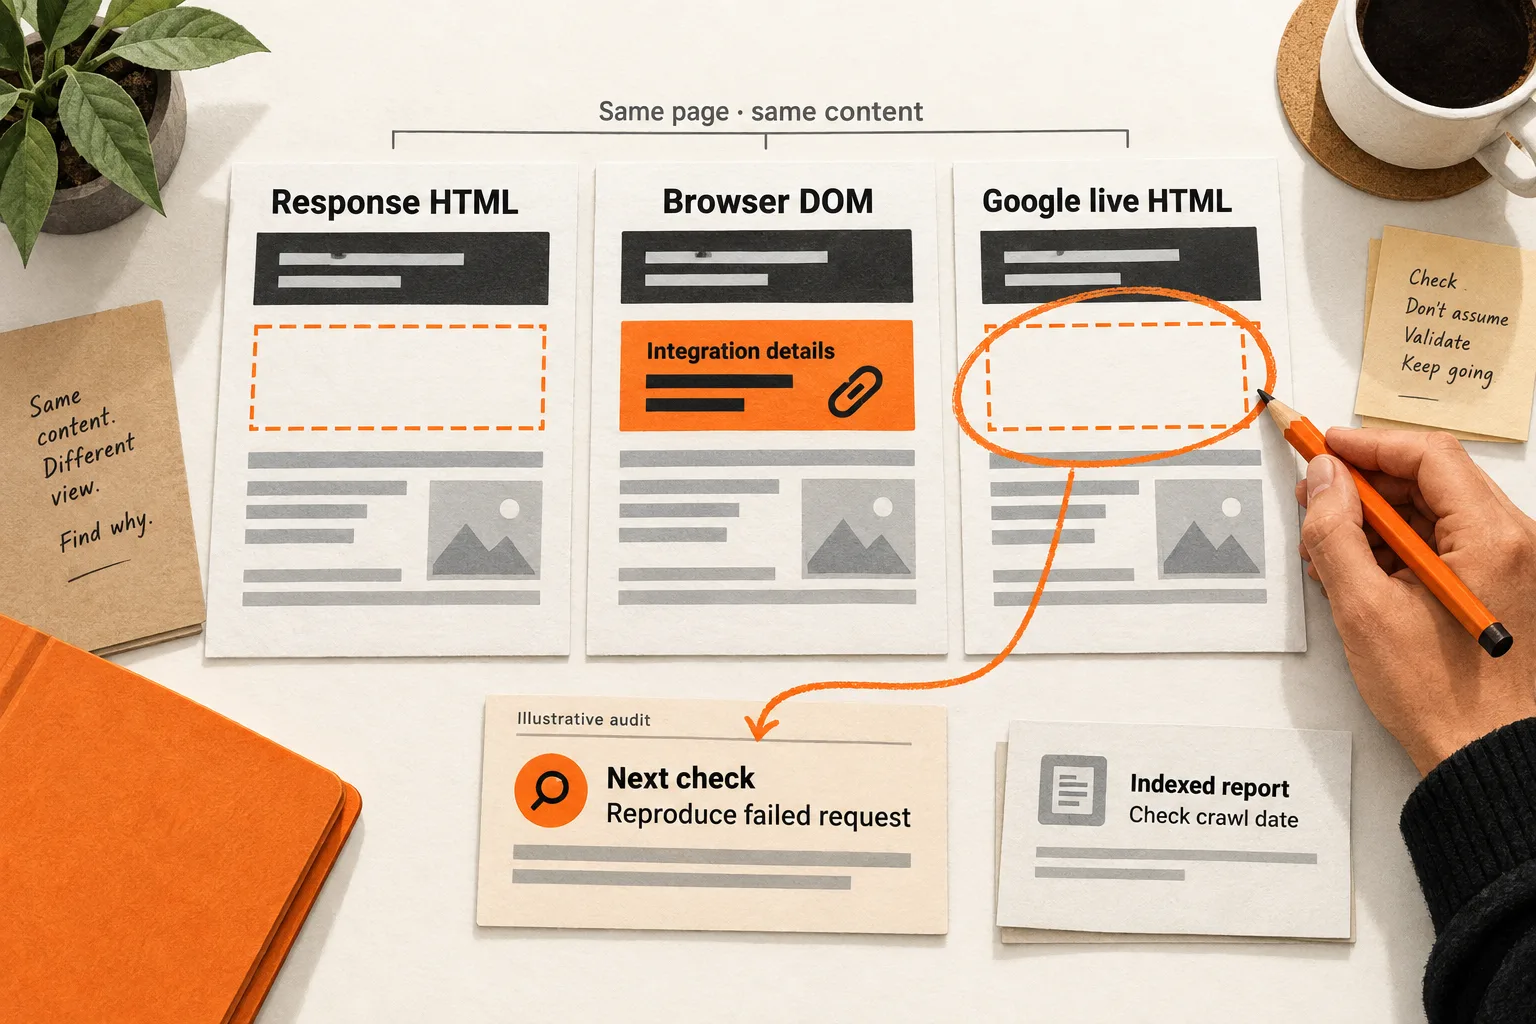
To check what Google can render on a JavaScript marketing page, compare the same content in three places: the document response, your browser’s DOM, and Google’s live URL Inspection HTML. Keep Google’s indexed report alongside them as a separate, dated observation.
Start with one important marketing URL. The goal is a finding a developer can investigate: which content is missing, where it disappears, and what a successful fix would look like.
Choose a page and define the expected content
Pick a public page that helps a prospective customer make a decision. A feature page with asynchronously loaded copy is a useful starting point. Include a second page using the same template if you suspect a shared problem.
Before opening developer tools, write down:
- The main heading and a distinctive sentence explaining the product.
- A limitation, integration requirement, or pricing detail buyers need.
- An internal link and its intended destination.
- The expected title, canonical URL, and indexing directives.
Use exact phrases so you can search for the same material in each version. Record the URL, time, and current release identifier if available.
Google processes JavaScript pages through crawling, rendering, and indexing. It can execute JavaScript and use the rendered HTML for indexing. An empty initial content container alone therefore does not establish a rendering failure. Google’s JavaScript SEO basics explain the process.
Capture the response HTML and browser DOM
Open the public URL directly in a fresh browser session while signed out. Record any consent choice or interaction that changes the content.
In Chrome DevTools, open Network, reload the page, and select the main document request. Open Response to inspect its body and Headers to record the response status and relevant headers. These are separate views in Chrome’s Network panel.
Search the response for your chosen phrases. Check whether they appear in content elements or only inside a script’s data payload. A string inside serialized data shows that the data arrived; it does not show that the corresponding paragraph was rendered.
Next, open Elements to inspect the DOM, the document structure the browser currently holds. Search for the same phrases and examine their surrounding elements. Chrome’s DOM documentation explains how to inspect and search this structure.
Record what appears before interaction. If clicking a tab or accepting a prompt changes the page, save that observation separately and describe the action. This keeps the conditions of your browser check reproducible.
Start the comparison table below. Fill in the Google column after the next step.
| Item | Response HTML | Browser DOM before interaction | Google live-test HTML |
|---|---|---|---|
| Main product explanation | Finding | Finding | Finding |
| Buyer limitation or requirement | Finding | Finding | Finding |
| Internal link | Destination or absent | Destination or absent | Destination or absent |
| Page title | Exact value or absent | Exact value or absent | Exact value or absent |
| Declared canonical URL | Exact value or absent | Exact value or absent | Exact value or absent |
| Robots meta directives | Exact value or absent | Exact value or absent | Exact value or absent |
For content, record present, absent, incorrect, or data only. “Present” means the expected text appears in the relevant content element. Record applicable HTTP indexing headers separately from this HTML comparison. Mark unavailable evidence as “not checked” rather than treating it as missing content.
Compare Google’s live test with its indexed report
With access to the site’s Search Console property, inspect the exact URL. Record the indexed report’s status, last crawl time, and Google-selected canonical when available. Then run Test live URL and record its timestamp separately.
The indexed report reflects stored information. The live test checks the current page; success does not guarantee indexing or predict Google’s canonical choice. Google’s URL Inspection guide explains these limits.
After a successful live test, open View tested page. Search its HTML for the same phrases and link destinations. Examine the screenshot for blank sections or unexpected layout, then review resource information and JavaScript output for clues. Google recommends inspecting rendered DOM, loaded resources, and exceptions when troubleshooting JavaScript.
If inspection evidence is unavailable, leave that gap explicit. Keep older crawl evidence separate from a live test after a release: they may describe different page versions.
Use the mismatch to choose the investigation
The comparison narrows the problem. Each pattern below points to a different next check.
Content is absent from the response but present in both rendered versions
JavaScript supplied the content successfully in those observations. Record the dependency and the test conditions. The missing initial HTML is not, by itself, a confirmed Google rendering failure. You may still choose to simplify delivery for reliability or maintenance reasons.
Content appears locally but is absent from Google’s live render
Look for failed resources or exceptions connected to the missing section. Check access to the script or data request that supplies it. Google does not execute JavaScript from files blocked by robots.txt or render pages blocked that way. A blocked script may affect the content that depends on it; the scope needs investigation. Google’s JavaScript guidance describes these access constraints.
Content appears only after an interaction
Determine whether the text already exists in the DOM and is merely hidden, or whether a click triggers its retrieval. Those implementations need different investigations. Google Search does not click or scroll to trigger content loading. Its lazy-loading guidance recommends methods that load relevant content without relying on user actions.
Content is present in the response but disappears or changes afterward
Capture the affected element and expected value. Ask the developer to inspect the code that replaces the initial content. Record both states; a screenshot of the completed page alone will not show the change.
The live test works, but older crawl evidence differs
Compare the crawl and release timestamps first. The current version may work while Google’s stored information predates the fix. Keep indexing follow-up open and record the current rendering result separately.
Worked example: missing integration details
Suppose an AI meeting-notes startup has a public CRM integration page. Its founder expects buyers to find which records receive notes, what permissions are required, and a link to setup instructions.
In this hypothetical audit, the document response contains the heading but none of those details. The browser DOM contains all three after loading. Google’s live inspection contains the heading and an empty details section. Its resource information also shows that the request supplying the details failed.
The handoff could read:
Expected: the integration explanation, required permissions, and setup link. Observed: absent from the document response, present in the browser DOM without interaction, and absent from Google’s live-test HTML. A related data request failed in the live test. Next check: reproduce that request failure and confirm whether it accounts for the missing section.
That finding supports investigating a specific dependency. It does not establish a sitewide failure or explain a traffic change.
Suppose the developer reproduces the failure and proposes generating the public integration details into the initial HTML. Interactive setup controls can continue loading separately.
The team still has a choice to make. Generating content at build time requires a dependable rebuild when integration requirements change. Generating it on each server request adds a runtime dependency. Repairing the existing client request may be a smaller change. Choose based on the confirmed cause and how the team maintains the content.
For the proposed initial-HTML fix, acceptance criteria are concrete: the correct details and setup destination appear in the response, remain correct in the browser DOM, and appear in a fresh Google live inspection. Repeat the check on another integration page using the same template. Record any later indexing or traffic outcome separately.
Copy the audit into a developer handoff
Complete one record per URL. Attach the comparison table and the relevant captured evidence so the developer can inspect the mismatch.
Public URL:
Page template:
Release identifier, if available:

Expected phrases and link destinations:
Expected title, canonical, and indexing directives:

Response capture time, status, and relevant headers:
Response HTML findings:
Browser capture time and DOM findings before interaction:
Actions taken and resulting changes:

Google live-test time and content findings:
Related failed resource URLs or JavaScript exceptions:
Indexed report status, crawl time, and Google-selected canonical:
Evidence unavailable or not checked:

Confirmed mismatch:
Suspected cause and next diagnostic check:
Proposed fix and owner:
Acceptance criteria:
Retest evidence for this URL:
Retest evidence for another page using the template:
Remaining indexing follow-up:
Prioritize missing buyer information and links to relevant pages. A missing integration requirement deserves more attention than a missing decorative animation.
Choose one public feature or integration page and fill in its expected phrases today. Capture the response and browser evidence, then add Google’s inspection evidence or assign that step to someone with access. Leave the record with a specific next check and an owner.
Once a fix passes, use the acceptance criteria in a recurring release check. FindVex’s guide to adding SEO regression checks to your website release process covers that next task.